
pfSense – HAProxy 포스트에서는 2대의 웹서버에 각각 2차 도메인을 할당하고, 동일한 80 포트로 동작시켰을 때 2차 도메인 주소에 따라 1번 서버 또는 2번 서버로 분리 처리되도록 HAProxy 를 설정하는 방법에 대해서 알아보았지.
이번 포스트에서는 pfSense 에서 HAProxy 를 이용하여 http 로 접속했을 때 https 로 전환시켜주는 설정을 해볼까해. 웹서버가 https 로 동작하기 위해서는 SSL 인증서가 필요한데, pfSense 에서는 Let’s Encrypt SSL 인증서를 사용할 수 있기 때문에 별도의 SSL 인증서 구입을 하지 않아도 돼.
우선 내가 보유하고 있는 도메인에 대해서 pfSense 에서 Let’s Encrypt SSL 인증서를 발급받는 방법부터 살펴볼께.
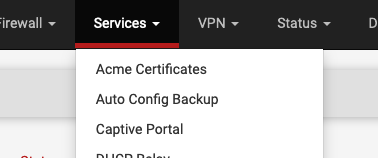
Acme Certificates
Services / Acme Certificates 메뉴를 사용하면 돼.
이 메뉴에는 3개의 탭 메뉴가 존재하지.
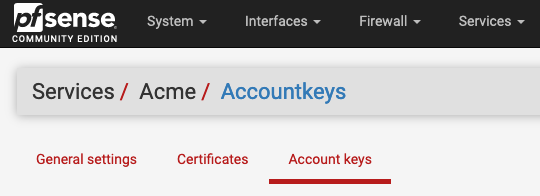
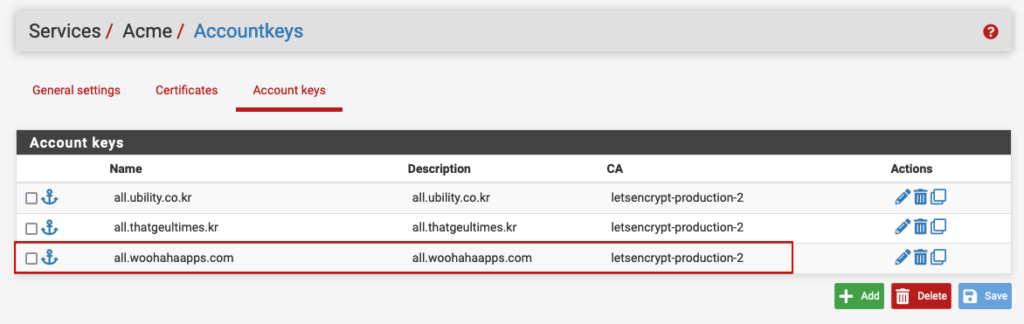
가장 먼저 Account keys 메뉴 화면으로 이동을 해. 여기에서 SSL 인증서를 발급받을 도메인 주소를 등록하는거야.
Add 버튼을 눌러서 SSL 인증서 발급에 필요한 정보를 입력해볼께.
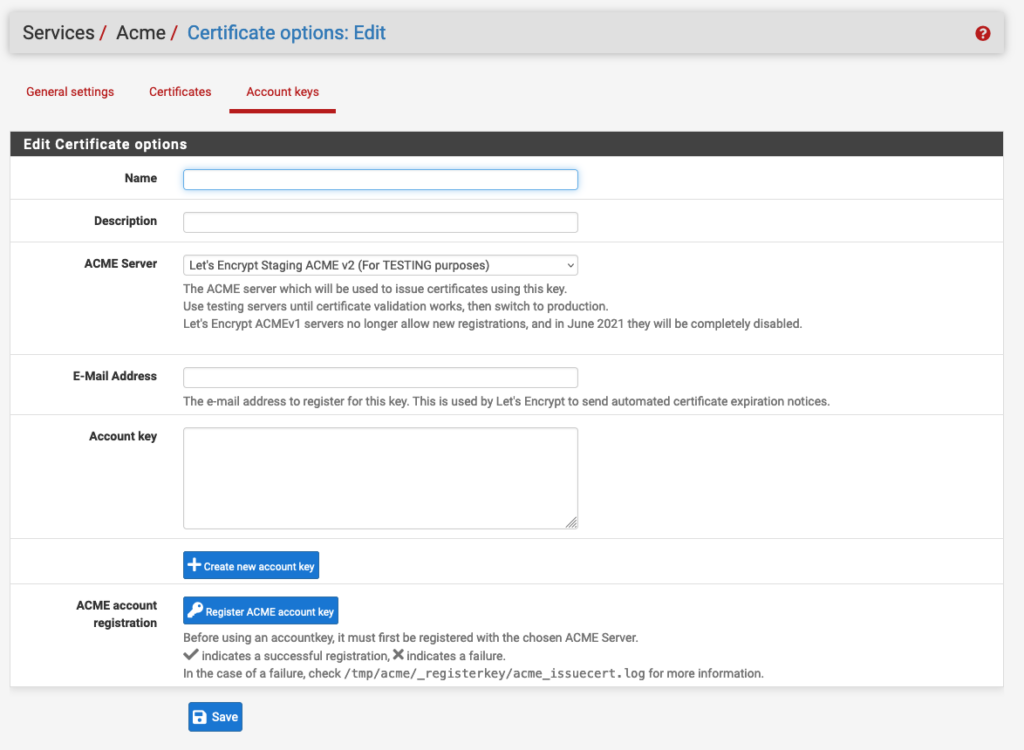
Name 에는 발급받을 도메인 주소를 입력하면 돼. 공백 문자는 허용하지 않지만, . 문자는 입력이 가능해.
Description 에는 간단한 설명을 입력해주거나 Name 과 같은 값을 입력해주면 되겠어.
ACME Server 는 여러가지 값을 선택할 수 있는데,
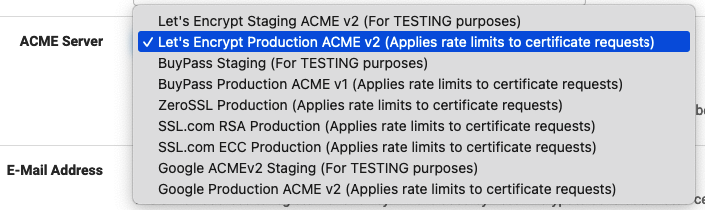
이중에서 Let’s Encrypt Production ACME v2 (Applies rate limits to certificate requests) 항목을 선택해 주면 돼.
E-Mail Address 에는 자신의 이메일 주소를 적어주고, “Create new account key” 버튼을 클릭해서 Account key 항목에 값을 채워넣자.

마지막으로 “Register ACME account key” 버튼을 클릭해서 account key 를 등록해주자.
이제 Account keys 목록에 방금 등록한 항목이 보일거야(나는 이미 3개나 등록을 해 둔 상태야).
이제 왼쪽의 Certificates 탭 메뉴로 이동해서 “Add” 버튼을 클릭하고 등록한 account key 를 이용해서 도메인에 대한 SSL 인증서 발급 요청을 진행해볼께.

위 그림에서 빨간색 사각형 안의 값들은 기본값을 수정한 부분이야.
가장 중요한 항목은 Private Key 로 384-bit ECDSA 항목을 선택한 부분이지.
Domain SAN list 에는 발급받을 도메인 주소를 등록해주는건데, woohahaapps.com 과 2차 도메인을 위해서 *.woohahaapps.com 을 등록해줬어.
이 부분은 DNS-Cloudflare 와 연동시켰는데, 조금 더 자세하게 그 값들을 살펴볼께. (내 도메인의 DNS 관리를 Cloudflare 에서 관리하고 있어야해)
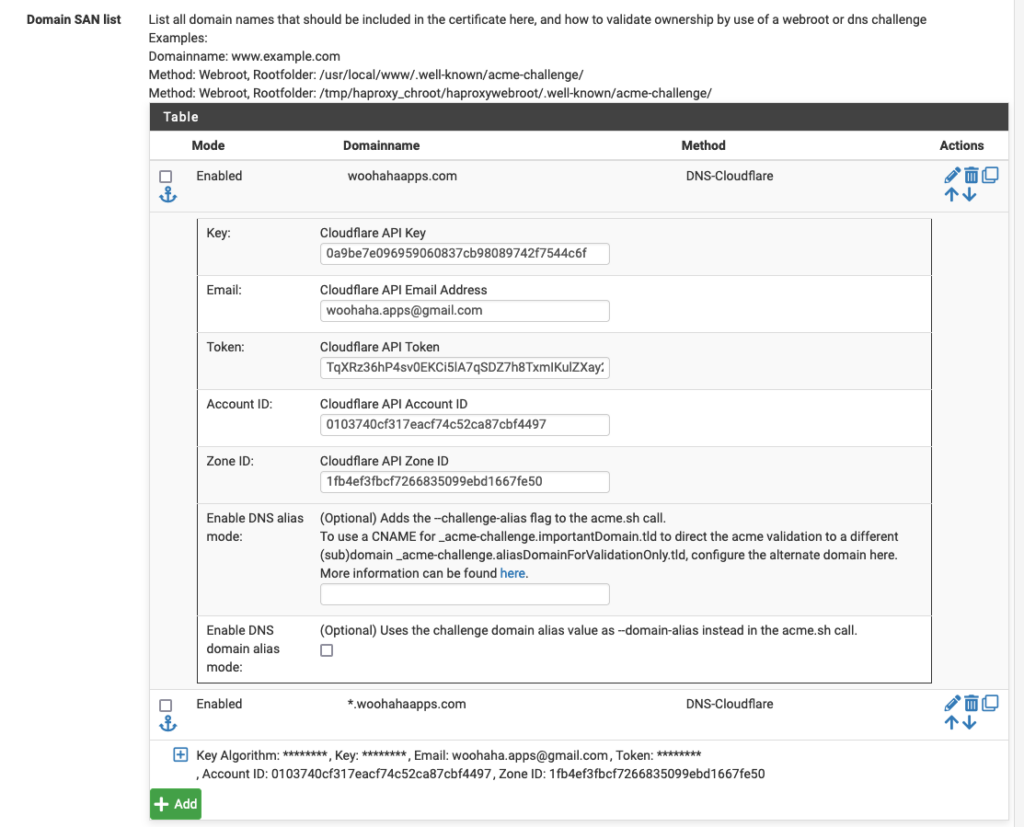
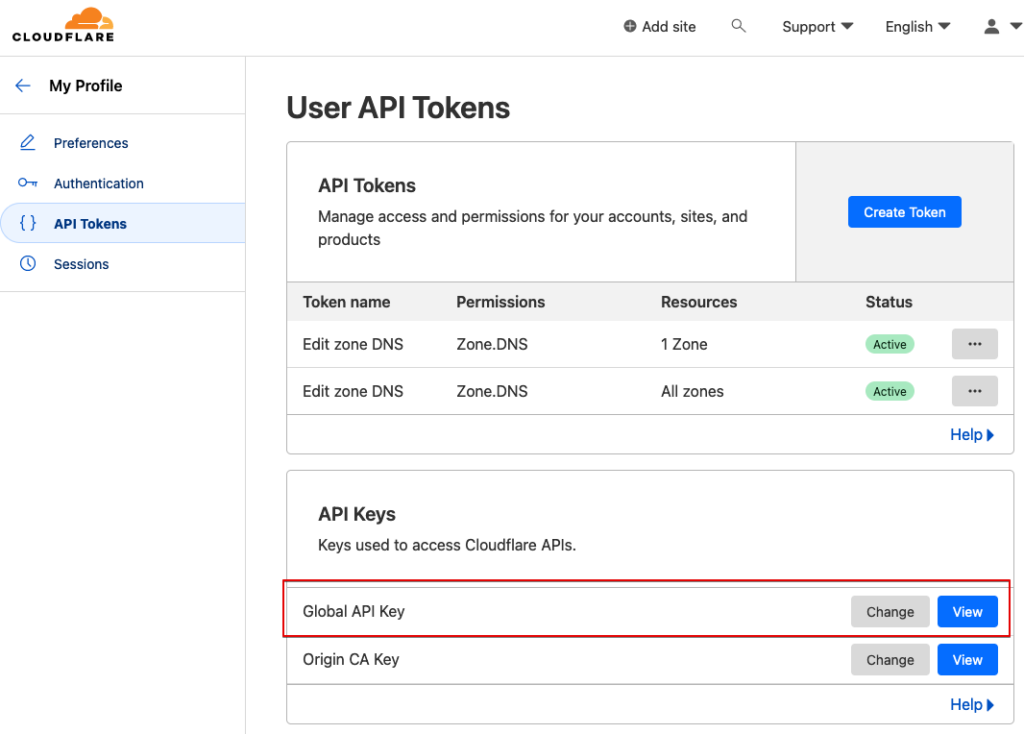
맨 위의 Key: Cloudflare API Key 항목의 값은 Cloudflare 에서 My Profile / API Tokens 화면에서 API Keys 목록의 Global API Key 의 값을 입력해주면 돼.
Email 은 Cloudflare.com 에 등록한 이메일 주소이고, Token 은 My Profile / API Tokens 화면에서 위쪽의 User API Tokens 에서 새로운 토큰값을 생성해서 입력하면 되는데,
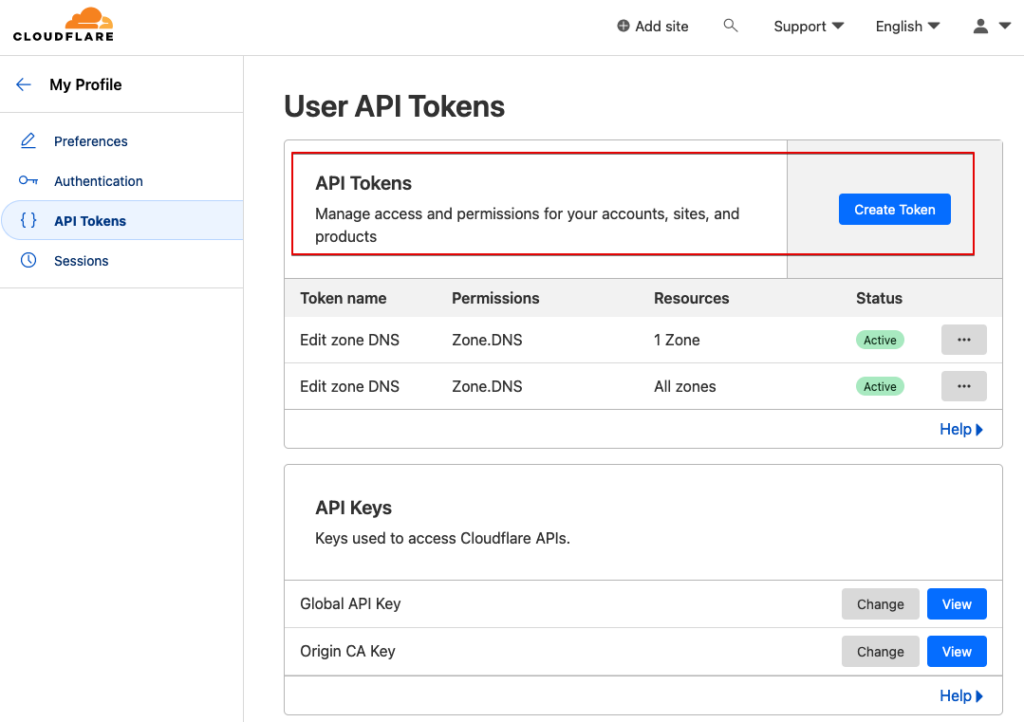
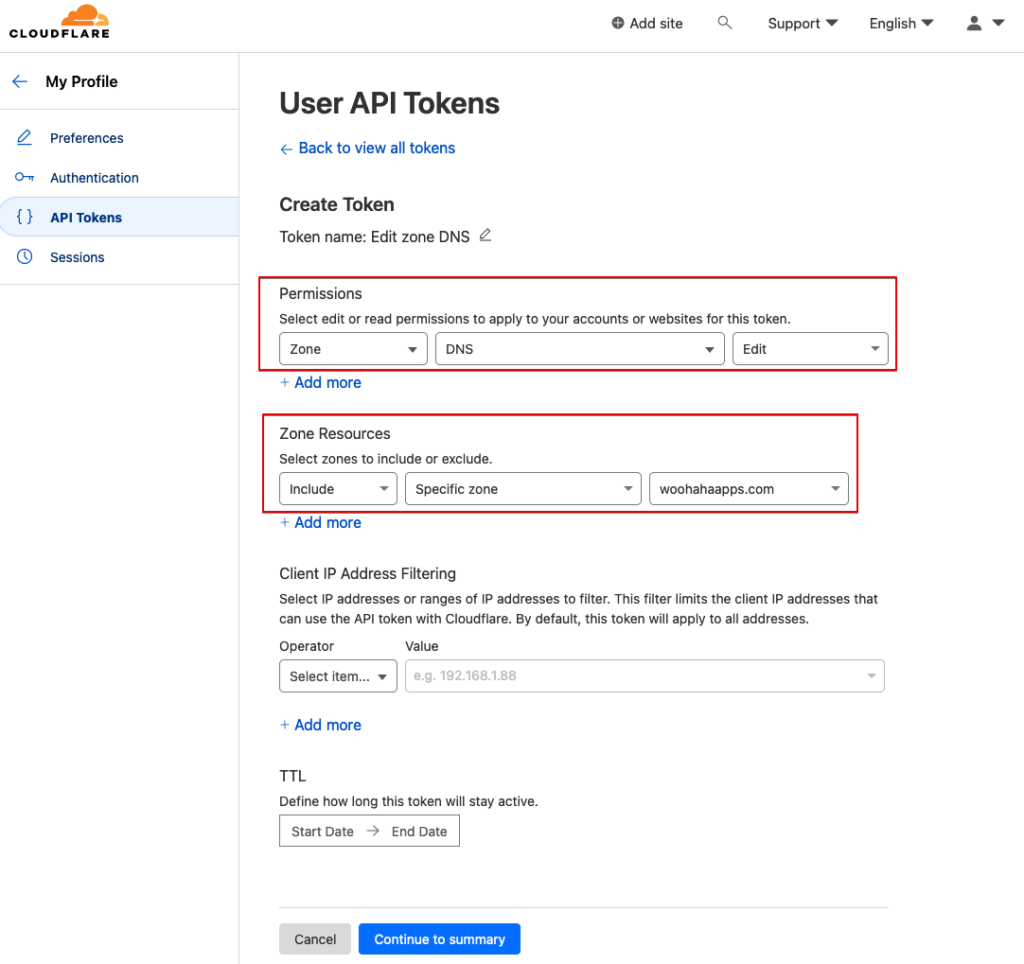
Edit zone DNS 템플릿을 사용해서 토큰을 생성하되
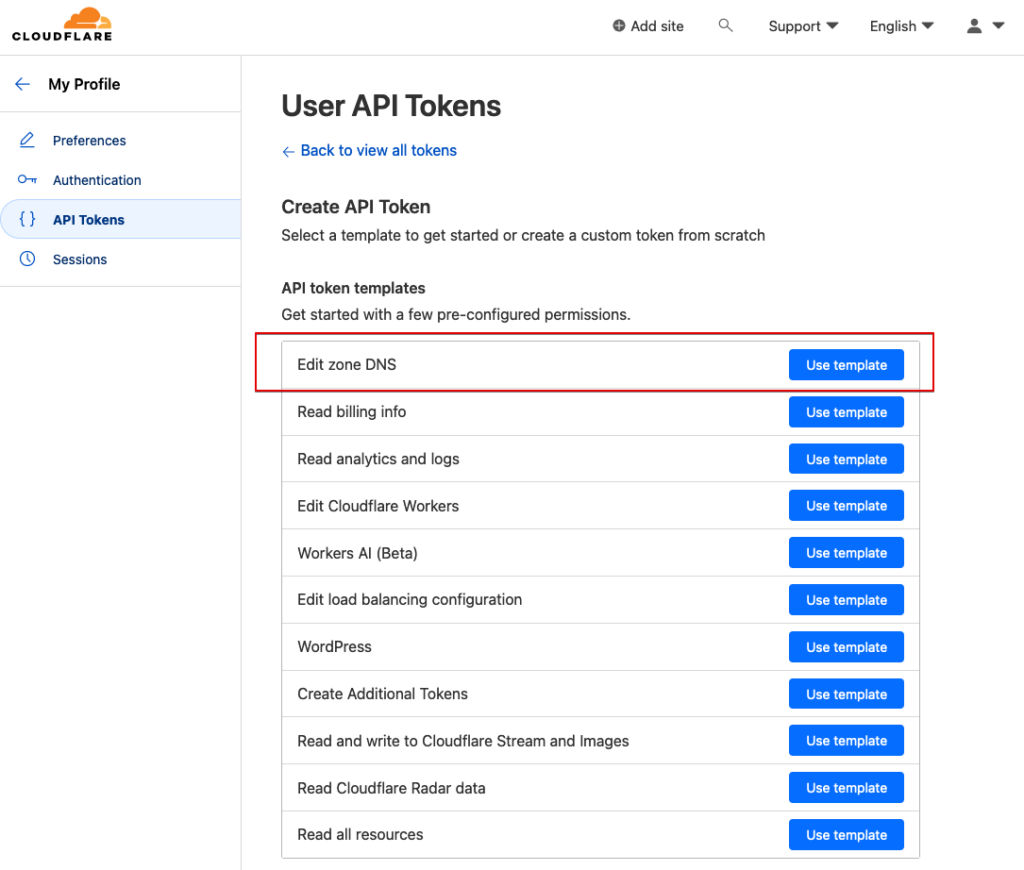
Permissions 는 DNS Edit 를 Zone Resources 는 Specific zone, 도메인 주소를 선택하면 돼.
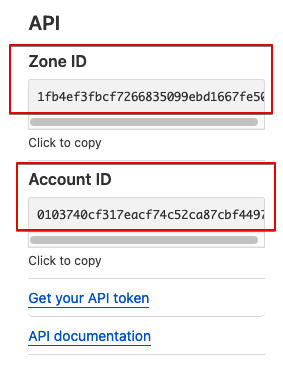
그리고 Account ID 와 Zone ID 는 Cloudflare 의 관리하는 도메인 화면에서 오른쪽 아래쯤에 API 그룹에 있는 Zone ID 와 Account ID 값을 복사해서 입력해주면 되겠어.
2차 도메인을 위한 *.woohahaapps.com 항목도 동일한 값을 입력해주면 돼.
맨 아래의 Actions list 에는 /usr/local/etc/rc.d/haproxy.sh restart 라고 Command 를 입력하고 Method 는 Shell Command 를 선택해주면 돼.
이제 저장하고 목록에서 Issue/Renew 버튼으로 SSL 인증서를 발급받으면 Last renewed 항목에 값이 나오게 되지.
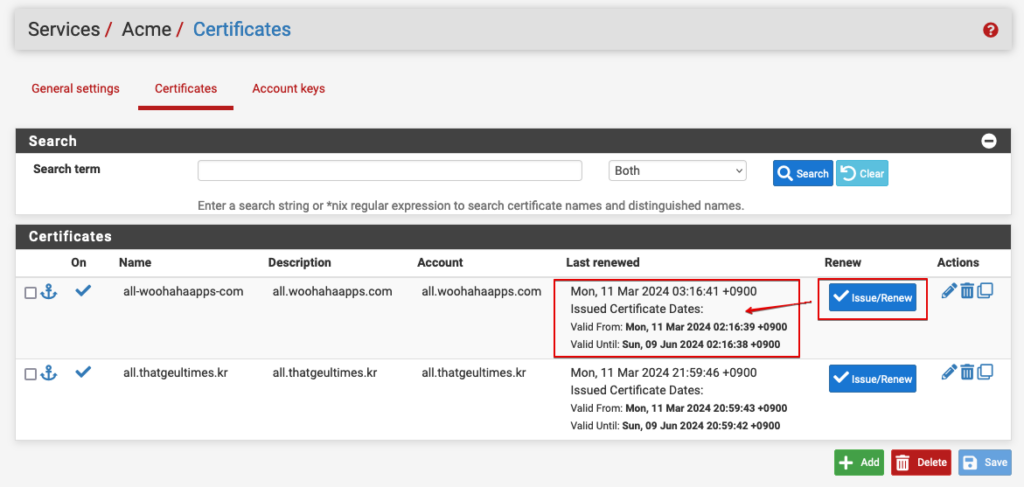
지금까지 한 작업으로 pfSense 에서 해당 도메인에 대한 SSL 인증서가 관리되기 시작했어.
HAProxy – Backend
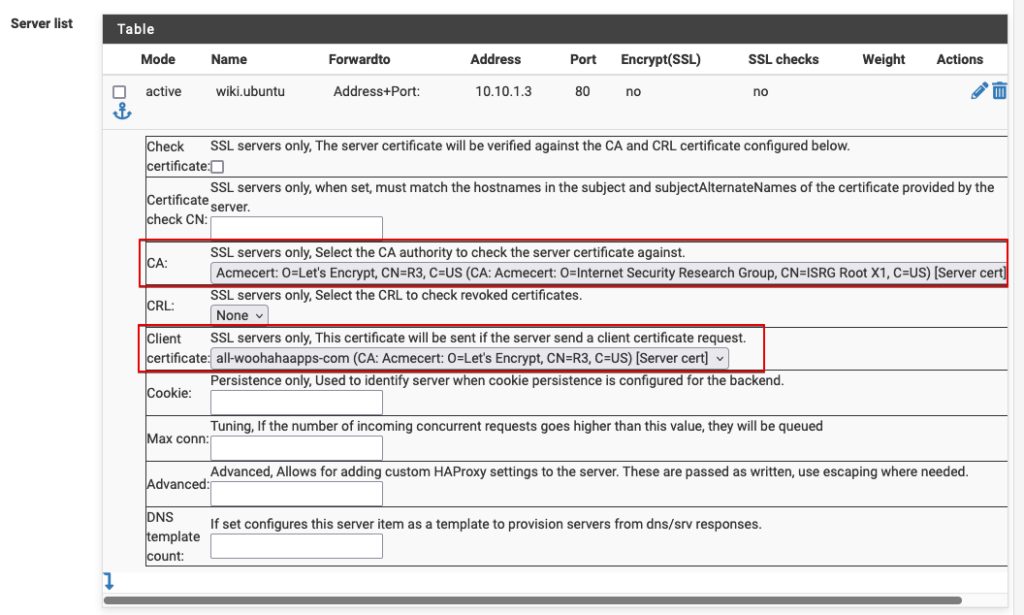
HAProxy 의 Backend 항목은 pfSense – HAProxy 포스트에서 설정한 2개의 항목으로 대체할께.
위에 작성한 포스트와 차이나는 부분은 SSL 인증서를 설정하는 부분이야. 아래 그림을 참고해서 설정하면 되겠어.
HAProxy – Frontend
가장 먼저 http 80 포트로 접속했을 때 처리하는 Frontend 항목을 등록해볼께.
설정값들을 구역별로 나눠서 보자.

Edit HAProxy Frontend 구역에서는 Name 과 Description 항목을 입력하는 것 말고는 기본값을 수정할 항목은 없어.
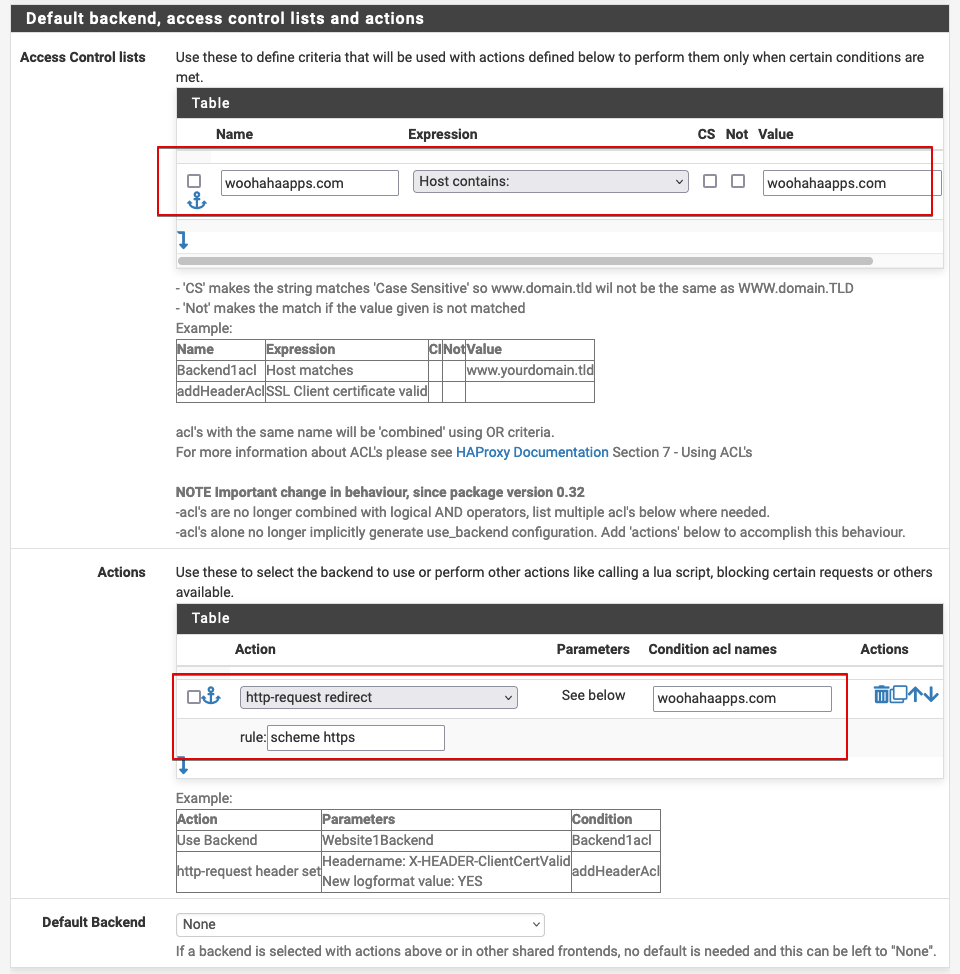
Default backend, access control lists and actions 구역에서는 Access Control lists 와 Actions 에 아래와 같이 입력해줘.
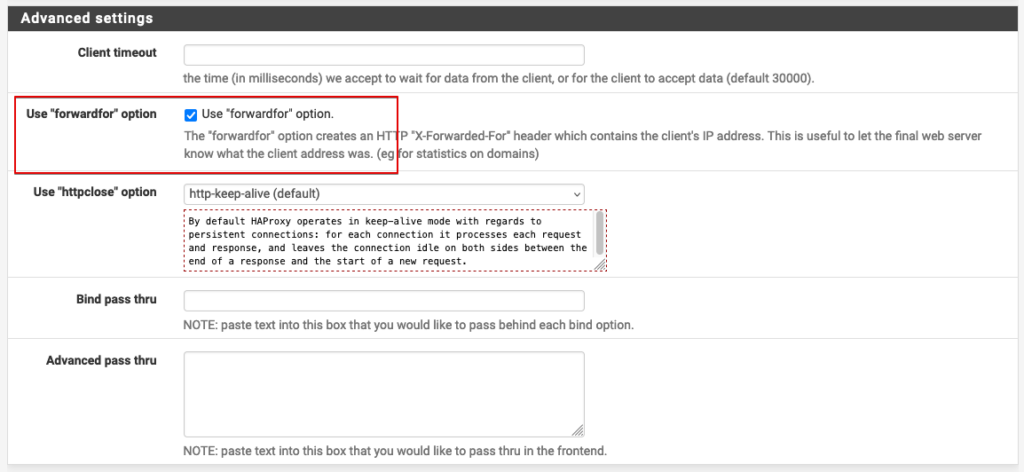
마지막 구역인 Advanced settings 에서는 Use “forwardfor” option 과 Advanced pass thru 항목의 값을 수정해줘.
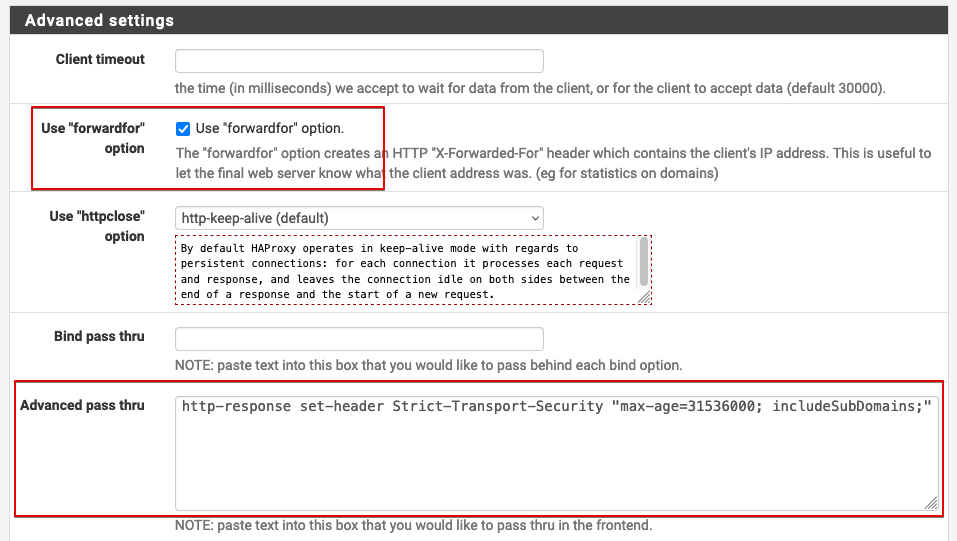
http-response set-header Strict-Transport-Security "max-age=31536000; includeSubDomains;"
http 80 포트로 들어오는 패킷이 https 443 포트로 전환된 이후에 처리하기 위한 Frontend 를 하나 더 추가해볼께.
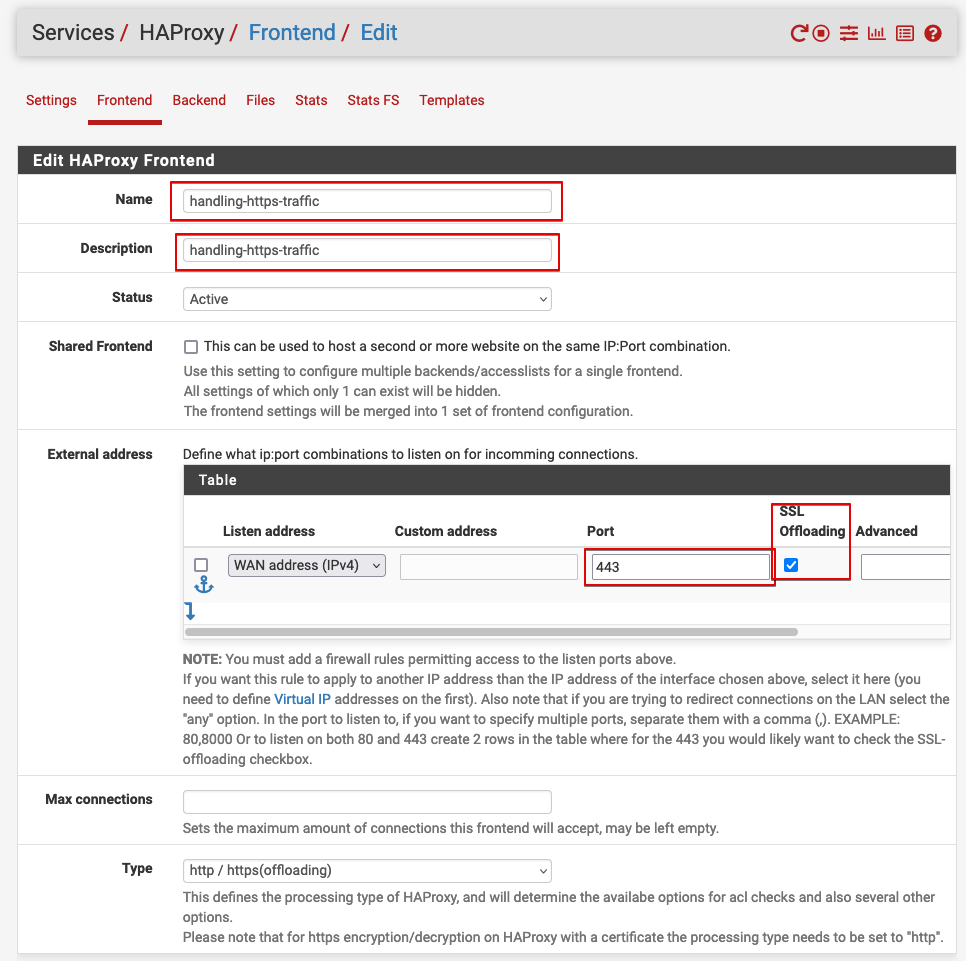
External address 영역에서 Port 는 443, SSL Offloading 은 체크.
다음은 Default backend, access control lists and actions 섹션의 Access Control lists 목록을 작성하는 방법이야.
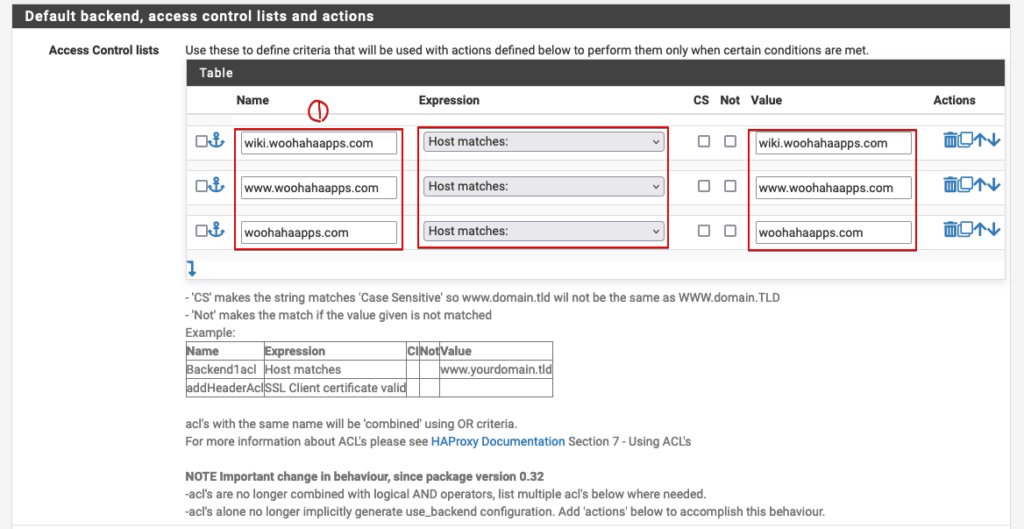
Name 값은 아래쪽 Actions 목록에 사용되는 값이기 때문에 도메인을 포함해서 이름을 잘 기록해주고, Expression 에서는 Host matches 항목을 선택해 줘야해. Value 는 실제로 처리될 도메인 주소를 기록해주면 돼. Name 에도 같은 값을 기록해주는 편이 구분되고 좋을 것 같아.
아래쪽 Actions 영역에는 각 도메인의 패킷을 처리할 방법을 기록하는 거야.

wiki.woohahaapps.com 도메인 주소 사이트가 운영되는 backend 항목, www.woohahaapps.com 도메인 주소 사이트가 운영되는 backend 항목을 정해줬어. woohahaapps.com 으로 들어오면 www.woohahaapps.com 으로 연결되도록 http-request redirect 를 선택하고 rule 값에는 location https://www.woohahaapps.com 이라고 입력해서 주소 이동이 되도록 했지.
Advanced settings 섹션에서는 Use “forwardfor” option 항목이 체크되도록 설정했어.
이제 가장 중요한 SSL 인증서 관련 설정이 남았는데, SSL Offloading 섹션이야.
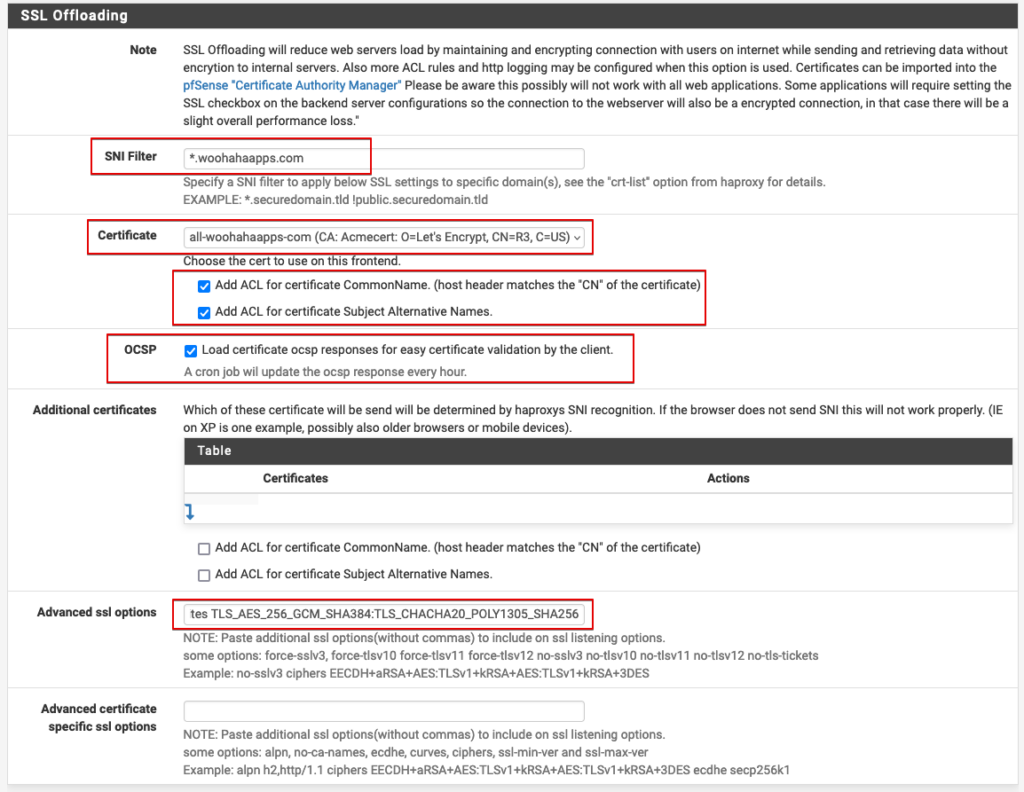
SNI Filter 에는 처리할 도메인 주소를 기록해주면 돼. woohahaapps.com 도메인에 대한 다양한 2차 도메인 주소가 처리되는거니까 *.woohahaapps.com 으로 기록해주면 돼.
Certificate 에는 사용할 인증서 항목을 선택해주고, 아래 2개의 항목을 모두 체크해줘
OCSP 항목 역시 체크해주고, Advanced ssl options 항목에는 아래의 값을 입력해줘.
curves secp384r1:secp521r1 ciphers ECDHE-RSA-AES256-GCM-SHA384:DHE-RSA-AES256-GCM-SHA384:ECDHE-RSA-CHACHA20-POLY1305:ECDHE-ECDSA-CHACHA20-POLY1305:ECDHE-ECDSA-AES256-GCM-SHA384 ciphersuites TLS_AES_256_GCM_SHA384:TLS_CHACHA20_POLY1305_SHA256이제 모든 설정을 완료했으니, 저장하면 되겠어.
80 포트와 443 포트에 대한 Frontend 항목을 모두 등록 완료한 모습은 아래와 같아.
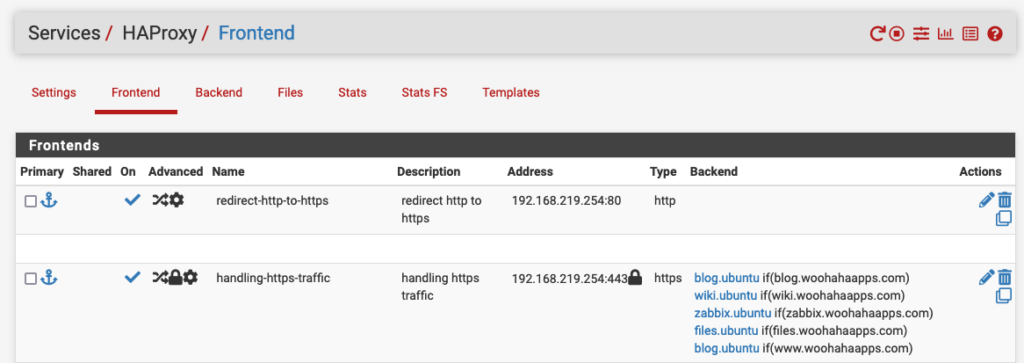
나는 실제로 몇개의 2차 도메인을 더 처리해야 해서 동일한 방법으로 추가해놓은 모습이야.
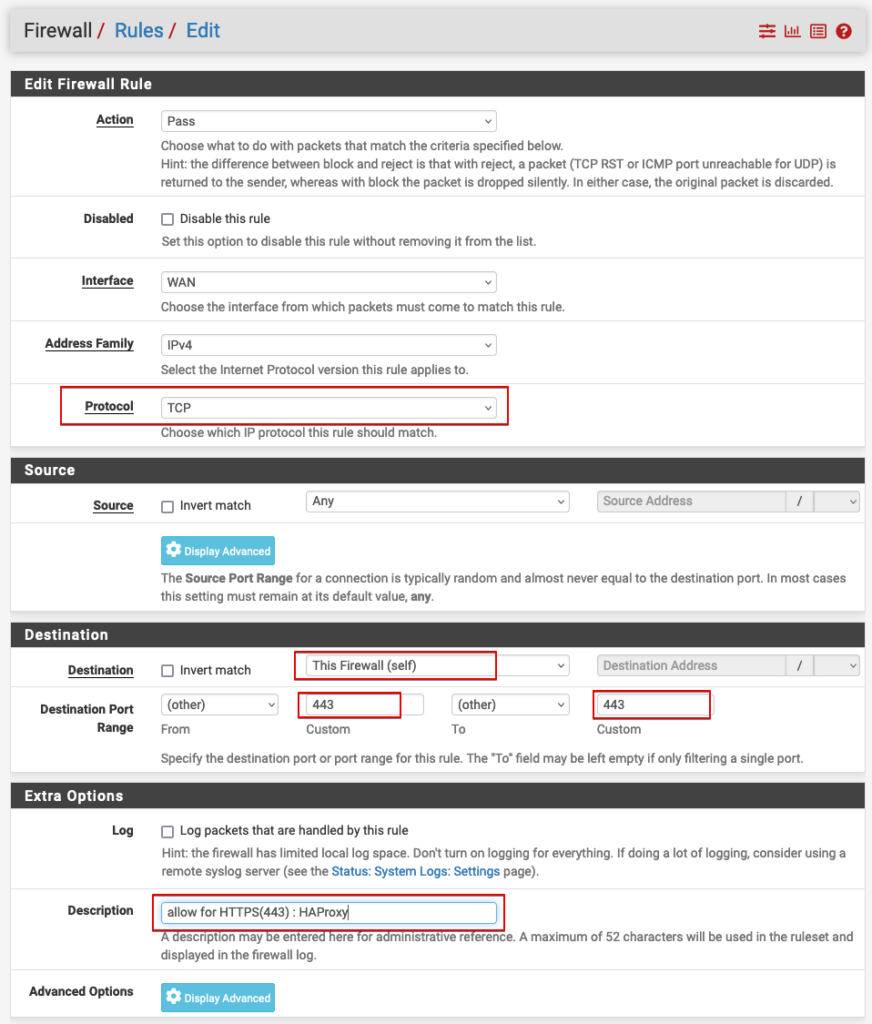
이제 Firewall / Rules 메뉴로 이동해서 443 포트에 대한 규칙을 추가해줄께.
규칙을 추가할 섹션은 WAN 인데, 아래 그림에서 빨간색 사각형 영역의 내용을 잘 보고 설정해주면 되겠어.
이제 웹브라우저에서 http://wiki.woohahaapps.com 으로 접속하면 자동으로 https://wiki.woohahaapps.com 으로 redirect 가 되고, http://www.woohahaapps.com 이나 http://woohahaapps.com 은 모두 https://www.woohahaapps.com 으로 연결되는걸 확인할 수가 있어.